
I was asked by Maaike of MaaiDesign to join her blog tour to showcase the new range of See You at Six fabrics. Joy of joy, I just can’t resist such requests!
I joined her first blog tour back in March, way before we ever met. Although, recently I had the pleasure when Maaike popped into our little studio to say hello. The conversation was something along the lines of “Oh my! you’re so TALL!” (me to Maaike) and “Oh my! you’re so SMALL!” (Maaike to me). It’s funny how you don’t get a sense of perspective on instagram and on blogs. Subsequently, I made her sit on the low stool in the studio.
So I had a choice to make, some lovely fabrics in soft drapey rayon. These were my top 4. Decision making is not really my forte, it took a while.


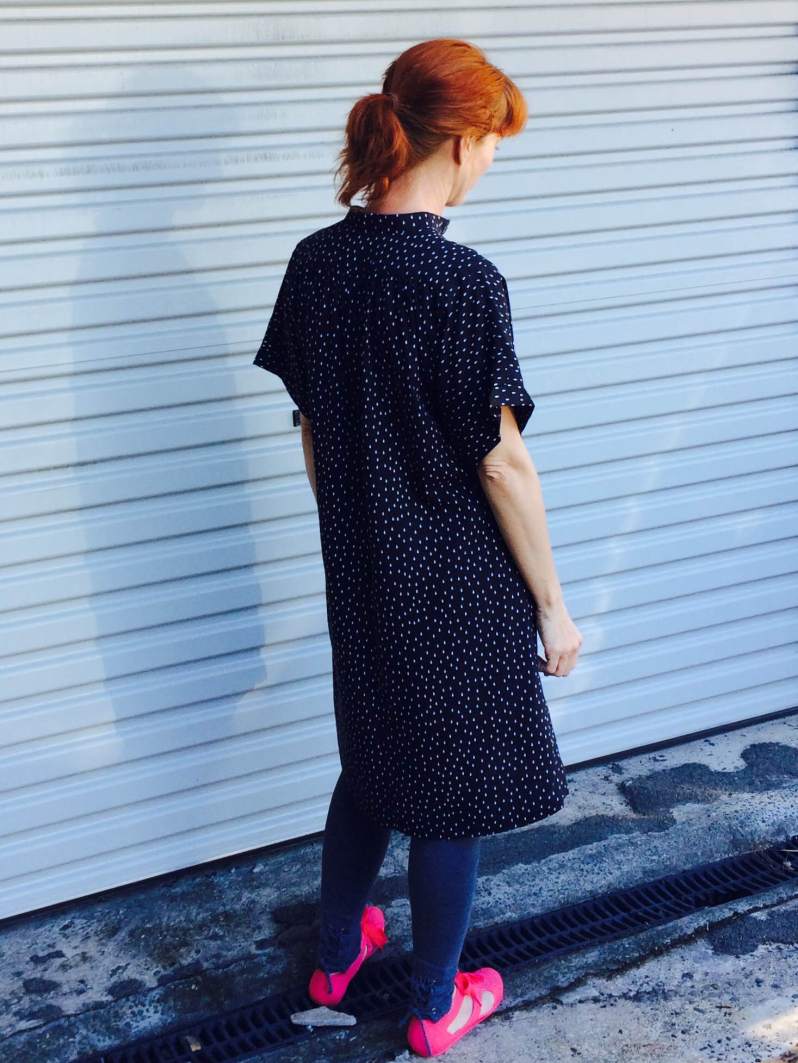
There are some beautiful colours and patterns in this collection; pastels, mint green, pale pinks and some lovely florals but I was drawn to the darker colours. After much ‘umming’ and ‘ahhhing’, I decided on the black and white drops. The randomness of the pattern is appealing to me. I like polka dots but don’t often wear them but this had a more contemporary edge to the design.
Rayon isn’t a fabric I use very often, mainly because I wear more boxy shapes which require structured fabrics. But I was excited by this challenge and really, it’s so lovely to touch! Now to find a pattern.
I had spotted this dress on my Pinterest page which was just what I was looking for. I had a starting point. I put it out to the ‘oracles of sewing’ (Sydney IG crew) for suggestions. Vintage patterns seemed to hold the answer. As you know I am a big supporter of the independent pattern designer, this is usually the direction I travel, but I decided to strike out and raid my vintage pattern collection. My vintage pattern collection, I might add, is vast!

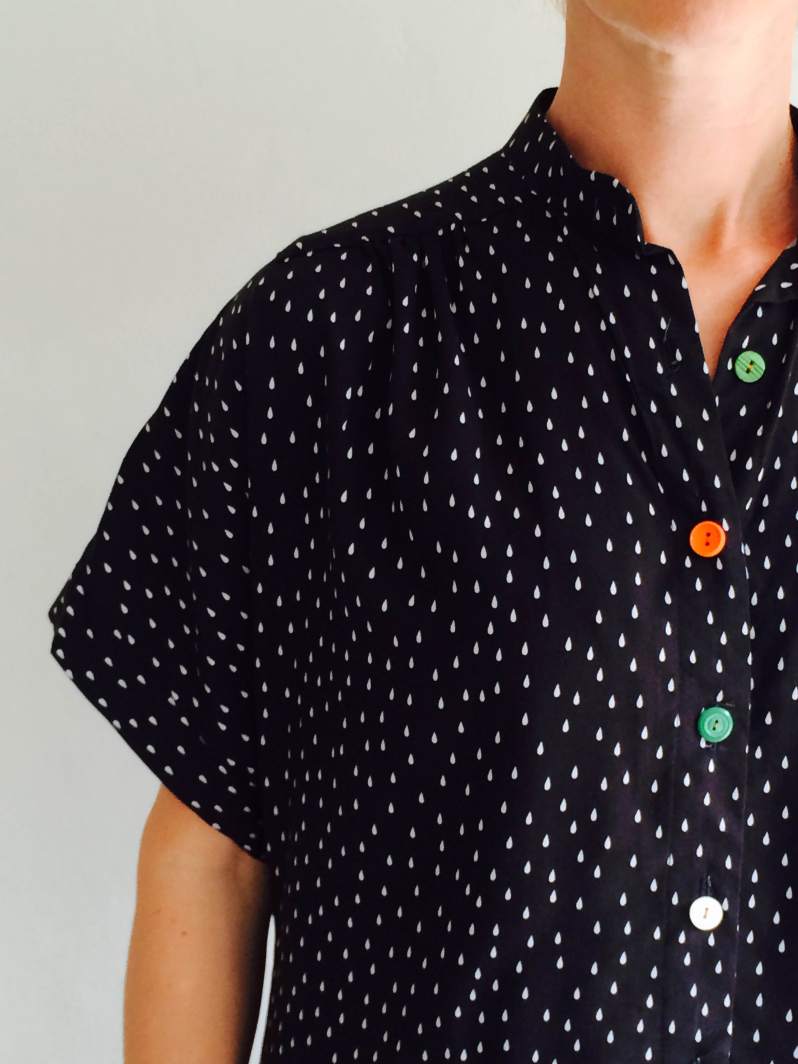
After a lengthy search I found it. A blouse (I love that word!) McCalls 8528 from 1983. The size was pretty good as it’s quite a ‘blousey’ blouse, all I had to do was hack it into a dress. I chose view D as I wanted the mandarin collar and the short sleeves with the cuffs. It also had the required kimono sleeves and the front gathering on the shoulders.

Ok, so let me just say that I am not a fan of gathering. The gathering may look minimal on the front but the back was a little more frightening. It seemed to have a lot of volume. I decided to trace it off and make a toile.
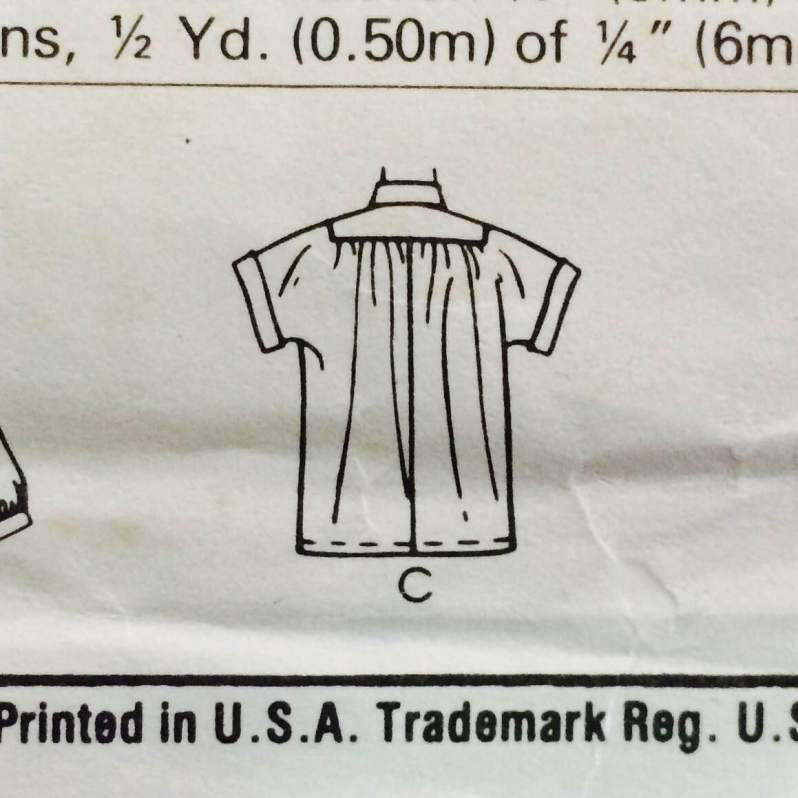
When adding the length to this blouse I literally draw it out as straight as I could, a slight A-line in shape but not too much. The toile was successful, although I prefer a little more room around my hips and so added a little extra to the back seam instead of the side seams. This gave me the room I needed. The top part fitted perfectly. It’s always a little frightening making a toile from calico, the gathering looked vast and rather comical. But I am glad I did or I would have been unhappy with the fit around my hips.
The first challenge was cutting the rayon. Luckily I have an expert on hand to help me. Emily (In the Folds) suggested I use her pattern cutting paper beneath the rayon. Firstly, I pinned the rayon together at the selvedges, then pinned it to the paper (using the guides on the paper as markers). I then went nuts with the pins and then added my pattern pieces. Here is a picture of some pieces so you get the idea. The result is crisp, perfectly cut pieces. It’s a pattern piece sandwich!


After that part, it was a fairly easy sew. I am surprised as I always image rayon to be a slipper sucker. It wasn’t, it was easy. I interfacing the front plackets and collar, put a 60/8 needle into my machine and away I went.
The biggest bugbear I had was with the yoke. Based on the instructions, this was the finishing on the inside. I just couldn’t live with that. I am not a perfectionist by a long stretch, but I think it would have bugged me forever so I decided to face it. I hand stitched it in place. I think it’s a much better result.


The final steps were the buttons and buttonholes. I actually tried to pretend it wasn’t happening for about a week before I worked up the courage to tackle them. I have done many in the past but I have never been happy with the results.
My machine has a buttonhole attachment so I did about 10 samples on the fabric. I even got my instruction book out and went through each step methodically. I just needed to get the balance right on either side of the hole (who knew this was a thing)? The results were fine but it does make me realise a superior machine may have reaped superior results, food for thought!
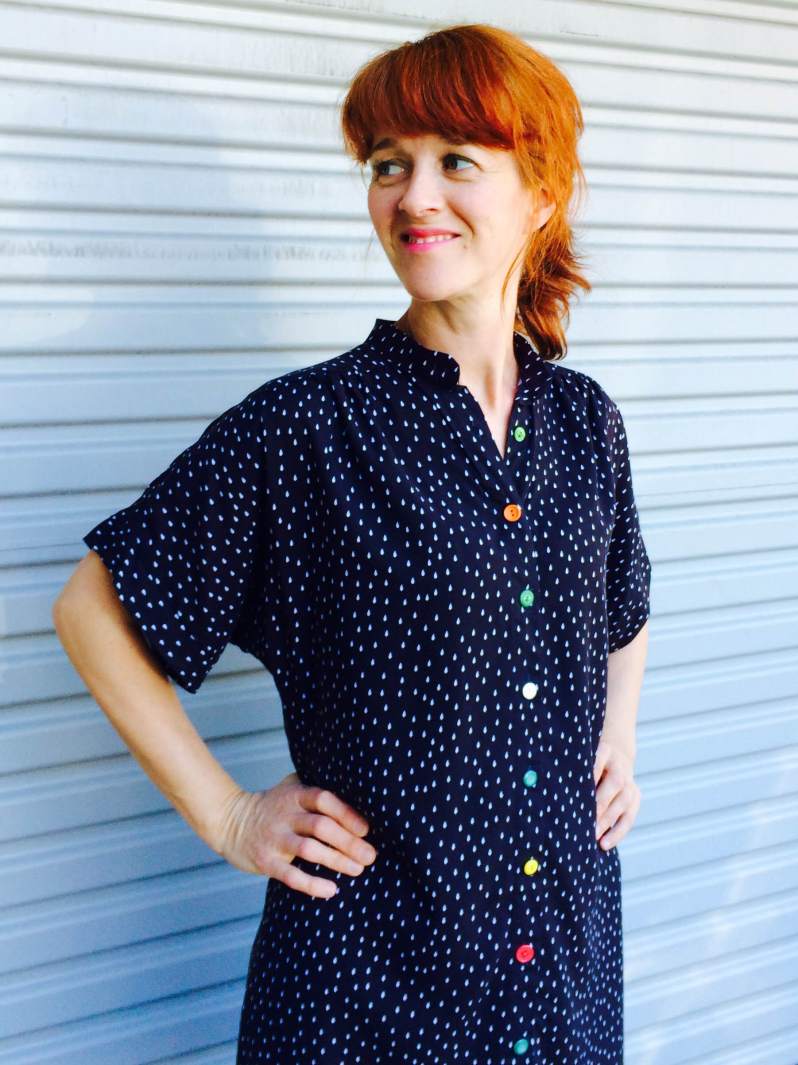
The button colour was another choice I was stuck on. I pinned a few options to the dress to get an idea. When Emily suggested I used all of them I went with it. The result is far superior for it. What do you think?
So here is the final result. I hope you like it as much as I do.


Lucky ducks! MaaiDesign is offering a 10% discount on the See You At Six collection from 12th – 30th September 2016. Just use the code: seeyouatsix.
For more inspiration check out these blogging chicks, ROCKIN’ THE RAYON!
12th of September: Shelley from Bartacks and Singletrack
13th of September: Kate from Sewing With Kate
14th of September: Nicola from Create.nic
15th of September: Anna from Blogless Anna
16th of September: Caroline from Usefulbox
17th of September: Suz from Sewpony
18th of September: Allison from The Tall Mama
19th of September: Toni from Make It Perfect
20th of September: Suzanne from Dressed in Pretty Little Things
21st of September: Natalie from Sew Outnumbered
22nd of September: Jenya from While She Was Sleeping
23rd of September: Maaike from MaaiDesign

Always a joy to discover a new blog post to brighten up the dreary morning bus journey! Would love to be able to do this! Another winner. Love the pic from Pinterest too 🙂
LikeLike
Thanks Kate! Happy to be on your commute x
LikeLike
OH MY GOD that inspiration image. The colours are incredible! Yours turned out beautifully too – the coloured buttons really make it.
LikeLike
I know it’s so good! The designer is very special. Thanks for the love x
LikeLike
Really enjoyed reading this Kate – massively inspirational and full of tips. This is one of my favourites of your makes – a triumph xx
LikeLike
Thanks Aimee! I am so glad you like it. It was a surprise to me how well it worked out. I would definitely suggest you try out some rayon. Is is no where near as scary as it may appear!! lol x
LikeLiked by 1 person
You are not going to believe this, but I actually made that very BLOUSE for my textiles assessment in high school in 1984!! I opted for the pouffy long sleeved version… yours is a very nice, far more fetching, update!
LikeLike
WHAT!!!! Are you shitting me? That is so amazing. I want photos ASAP. We were meant to be friends, there are some many reasons why and this is yet another fabulous reason.
LikeLike
Thank you for being part of this blog tour Kate. I love what you made. Although it is a drapey fabric the result is still very much YOU. And I share your fear for button holes, even though my machine is pretty new!!!
LikeLike
Lovely and very you! Will be great with bare legs and sandals come summer too!
LikeLike
Roll on summer x
LikeLike
This is the kind of pattern that rayon is perfect for! Nicely picked and beautifully made. It looks great!!
LikeLike
Thank you Shelley! Loved your gorgeous frock too. Horray for rayon x
LikeLike
Gee I would sit there for a week feeling anxious about a possibility of ruining such a lovely dress with buttonholes! Love the colourful buttons on black and white. And thanks for the tip on cutting rayon – heaps more sophisticated than cans of tuna hahaha
LikeLike
Jenya – I know, it was nerve wracking! The buttonholes are ok but it’s made me realise I need a better machine. The cutting of rayon was such a success that it’s made me feel confident to try other scary fabrics like silk!! Eek
LikeLike