I think it’s fair to say that I have taken the idea of ‘slow sewing’ to a whole new level. I am not entirely sure this is a bad thing, I think that churning out make after make is, I suppose, probably as bad as fast fashion. So the idea of slowing down and really choosing my projects with care is probably a good thing overall. Problem is, it doesn’t quite satisfy the maker in me. Food for thought.
The Pattern:
So, onto my latest make, a great pattern by Merchant & Mills, the Ellis & Hattie Dress. I bought my pattern from Stitch 56, it’s thrilling to have a paper pattern, I rarely treat myself.


It was the neckline, darts and sleeves of the Ellis version that really won me over. But I did hesitate initially, the skirt part, it’s just not me. I am not keen on a gathered skirt, it just adds volume where I don’t need it. So, I decided to hack up a perfectly good pattern and make it my own.
The toile:
I decided to extend the bodice of the Ellis and make it into an slightly A-line dress with inseam pockets. I also wanted to add in an exposed zip which meant I needed to alter the back by adding a yoke. Starting point was this toile.


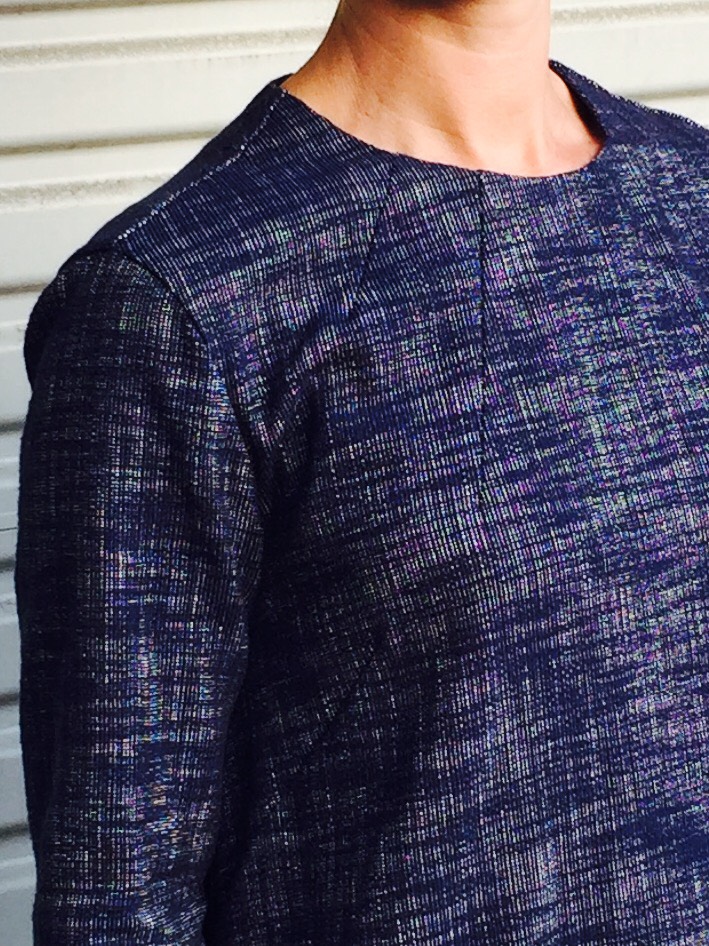
A couple of issues emerged. Firstly, the shoulder seams were way too big. I notice on the original shots from Merchant & Mills that they don’t sit right on the shoulder of the model. They were way too big for me though, so I decided to remove a couple of centimetres.
I have altered the shoulder seam before on a previous make. I had to add width to the shoulders on my Frankie dress, here’s how I did that. But for this dress I needed to reduce the shoulder seam so I reversed the process. I drew a diagonal line from the shoulder seam to the arm hole and then slit the pattern (leaving a few millimetres to allow for the pivot). I then reduced the seam by 2cm and then trued it up. If you try this at home, remember to do this to the front and back!


I also felt that the neckline was too high so I reduced it, again by a couple of centimetres.

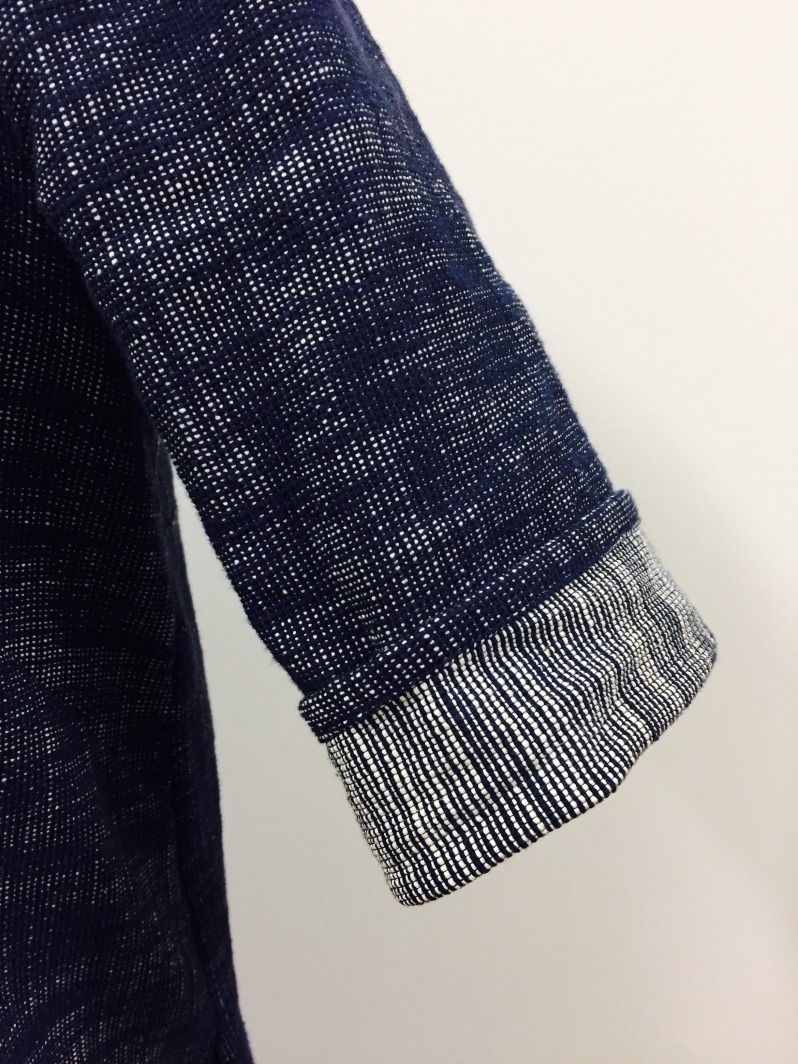
I decided to add some length to the sleeves. I just wanted them a tad longer to cover my elbow. Finally, I changed the back yoke, mainly to accomodate an awesome zip that I wanted to fit here. I lengthened the yoke accordingly.
The fabric:
I bought this fabric at FabWorks on my recent visit to the UK in June last year. Yep, it’s been sitting in my cupboard staring at me for a whole year. It’s a fantastic fabric. A heavy and slubby cotton in a dark inky blue. The fabric works either side, but I preferred the darker option. I would love to say that I remember the fabric specs, I always think I will and then never do.
The result:
This all sounds easy and quick, and yes, to someone concentrating on it for a stretch of time it is. But, I tackled this piecemeal, in mini pockets of time. The ultimate slow sew. After a few weeks of tinkering away, I made it and I really couldn’t be happier with the result (even if my forced smile below suggests otherwise).


I am super pleased with the fit. The top of this dress is perfect and I think it suits my shape. The darts give it a lovely shape. The only issue is that the fabric is so textured that the darts vanish a bit. I really liked the top stitched darts on the Merchants & Mills version, I did consider this but chickened out at the last minute.

The back of this dress turned out much better than I expected. My initial plan was to reverse the back yoke and have the white side of the fabric exposed. But, when I was sent this zip by Who Says Sew it just had to be part of the dress, it worked so well. The original pattern calls for a button closure so I had to work out the addition of the zip. It wasn’t too difficult but what I did fail to do (think piecemeal sewing and not concentrating) was consider how to finish the top of the exposed zip.


In the end I had to remove some teeth, I used a little tutorial from Makery to help me with this. I then unpicked the facing and sandwiched the zipper tape between the facing and the dress. It was super fiddly and but I managed to get a (fairly) clean finish with the machine and some nifty hand stitching.


I can see another Ellis in my future, it’s really a lovely pattern. The instructions are clear and well executed. I am looking forward to hacking up the Hattie version in the summer. Watch this space.
There is only one gripe I have with this make, this time it’s down to me, not the pattern. I added the inseam pockets far too low down the dress. When my fingers hit the bottom of the pockets, my arms are almost straight. I also feel that the pockets are adding volume just where I don’t need it. At this point, the pockets are still in, but I am sorely tempted to remove them just to slim the silhouette down a fraction.
What do you think? With or without pockets?
x

Gorgeous Kate, looks great on you too x
LikeLike
Thanks love, I am super pleased with it!
LikeLike
Looks great… what about moving the pockets up to a user friendly location and then Topstitching them to the front of the dress? I tend to find inseam pockets on loose dresses do flop around and add a little volume at the hips.
LikeLike
Thanks Sarah, I like that idea of top stitching, that could work. Will have a think (and possibly another wear). Thanks for reading x
LikeLike
Hi, I have had exactly the same problem with a different pattern and I took the pockets off. I think you should also. I love love love pockets but haven’t come up with a better way to do it. My most fav pockets are in the front in a seam especially created to take a pocket bag, you could try that but it works best I think in a straighter dress. In spite of the pockets it looks great on you. Sue
LikeLike
Thanks Sue – I agree, my gut feeling is to remove them. Thanks for sharing your thoughts x
LikeLike
It’s awesome Kate. All your work has paid off beautifully. Your dress is gorgeous & I wish it was mine. Thanks for the detailed & helpful blog post too.
LikeLike
Thanks for reading, Anna. So glad you like it x
LikeLike
Kate, this is such a special make. Your attention to detail and care lift it to a whole other level. It really is so gorgeous. Love the exposed zip, definitely think you chose right in not topstitching the darts (and I love topstitching!) and I think the pockets are great. I don’t think they add bulk at all. The lines of dress are so sleek. Please say you’ll wear this when we catch up?? xxx
LikeLike
I am definitely wearing it!! See you soon x
LikeLike
How lovely! You mentioned wishing the darts at the neck popped a bit more – a thick white embroidery thread in a simple running stitch down the ‘ditch’ of each dart would look nice I think. And if you ended up not liking it, super easy to take out again 🙂
LikeLike
I like that idea. I think the white would really pop. Thanks for reading. X
LikeLike
Love Love Love this pattern hack…. I love the details of this style, i.e. the neckline darts but like you, I’m not a gathered skirt wearer, I much prefer the silhouette of your finished dress… like the idea of pockets, I usually make mine from a lighter weight fabric to reduce the bulkiness… with or without pockets this is a beautiful dress
LikeLike
Thank you so much Karen for your lovely message. X
LikeLike
I say the pockets stay, I love them. I love the dress and have the pattern. I feel exactly the same about the gathers and have been putting off making it. I’m going to try this. I made the Fielders in light denim and used lining fabric for the pockets.
LikeLike
Hi Kate – I’ve had this pattern in my cupboard for ages and have been itching to start a new project but when I looked at the various images submitted of this dress – well, I’m tall and pretty thin so really baggy dresses just don’t look great on me and I was disappointed until I saw your images and read your blog so thank you so much for the inspiration. I think I’ll be doing a bit of hacking myself :). BTW it looks great on you.
LikeLike
Carole
I’m so glad you like it. I think removing the gathers will work really well on your frame. Would love to see your finished version x
LikeLike