In July I decided it was time to address my fit issues with the Acton dress. My decision was spurred on by the wedding of my lovely friend Katie, back in Sheffield. A solo trip to the UK too, whoop whoop! Hanging with the girls, lots of laughter, a few tears, commiserating about middle age and discovering we can’t handle the booze like we used to.

So onto my dress.
I made up another bodice toile, this time using some calico. I had initially made up a size A (see previous post) but I went back to the size B and reduced from there. The issue was the depth from the neckline to the boob so I altered the pieces, see below.


I bought this gorgeous kimono in Byron Bay on our 10 year wedding anniversary. I had been wanting to refashion it from the moment I saw it. I know you will think. Why? Why cut up something so beautiful?
Yes, I did momentarily grapple with it myself, but it was a cheap cotton kimono, so nothing valuable or vintage but the fabric was TDF (that’s ‘to die for’, Mum)! I think I was drawn to the ‘pins and needles’ pattern subconsciously. I didn’t notice the pattern until it was pointed out to me some months later. The main point is I wouldn’t wear it as it is, I wanted something I could wear that was more special than a simple dressing gown that I would spill my cereal down.
The Acton and my kimono were a match made in sewing heaven. I was pleased I had made this dress before I attempted this refashion, as cutting into the kimono was the scariest thing I have ever done.


I had decided that I would use a plain black fabric for the front of the dress as this part is hidden by the wrap. This meant I only needed to cut the back skirt and front & back bodice pieces from the kimono fabric. PLUS, I wanted to save the top of the kimono to make into a bolero jacket.* Not asking much eh?
*I will write about this in my next blog post
The placement and cutting went well. I was careful to adhere to grain, using the back seam as a guide. The kimono is the thing of hand stitched beauty. I decided not to unpick every seam (which would have given me more fabric) but to leave the existing seams intact and use them as a design feature.

I made one small error when cutting the bodice. I really didn’t want a red dot on my nipple, which is exactly what I got! I had enough fabric to recut this one panel.

So here it is (I gatecrashed the In the Folds photoshoot to get these shots, thanks Emily, Sam & Felicity!)

There was no pattern matching, the randomness of the pattern is a highlight for me. As you can see the re-cut bodice piece works so much better.

The fit is also so much better. I was glad I went back to the size B and worked from there. Reducing the bodice really did work well and now I have a wrap that actually meets in the middle!
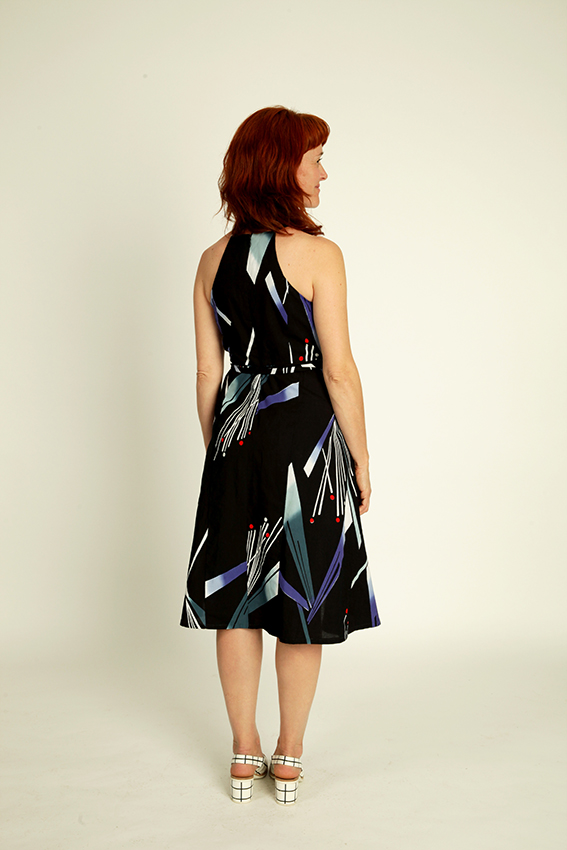
No back splurge this time!

The skirt is by far the best part as the kimono seams are visible and quite lovely. Here you can see the skirt in more detail and you can catch a glimpse of those kimono seams. I think it looks great, it gives the dress a real story.

A more relaxed low waist tie option here. You can also see the plain black fabric I bought for the front of the dress. The black was a perfect match (as you know its not always easy to match black). I also used it to line the bodice. I bought this piece from Tessuti Fabric.

I think this is the best invisible zip I have ever inserted. I left the dress open here, I like the way it hangs from the back.
I have worn this dress loads already. Pretty much every time I go out I wear it. It was such a great dress for the wedding but I have also worn it to dinner many times. It’s cotton so I never feel overdressed. My party trick is opening the wrap to show the square shape to anyone who complements my dress (which happens often). It never gets old (well not for me anyway!)
I hope you like it x
NB: I was given a pre-release copy of the pattern for free in exchange for a fair and honest review. All links to the Acton dress are affiliate links.

Fabulous Kate. Just fabulous.
LikeLike
Gosh Kate, this is just exquisite. I adore this style on you and that fabric… swoon. It was a great move to place the black panel at the front, you are lucky you found a match. I’m guessing from the cut of the bodice and the narrow straps that this is a strapless bra dress only? I really love this pattern, but I think I’ll sit it out. I just can’t go strapless or bra-less. Learnt that from my Tessuti Annie dress, which I’ve worn… once.
LikeLike
Thanks so much, I am so pleased with it. Such a great party frock and I can see myself wearing this for years to come. It is indeed a strapless bra bodice, although I wear those stick on cups which work really well with this dress. X
LikeLike
Beautiful! I love seeing how someone has refashioned a garment into something new! It’s inspiring and encouraging. A Kimono is perfect b/c usually they have loads of fabric in them. I didn’t realize this pattern was so intricate.
LikeLike
Thank you so much – I look forward to sharing the jacket I made with the top part of the kimono X
LikeLike